

Magnetism is one of the most intriguing forces in nature. From the compass that has guided explorers for centuries to modern maglev trains that float above tracks at astonishing speeds, magnets are at the heart of many technological wonders. Beyond their practical applications, magnets can be used in fun DIY experiments and creative projects. In this article, we’ll dive into a series of hands-on experiments that explore how magnets can be used to create levitating objects, move models without physical contact, and even play a role in magic illusions. This guide not only explains the science behind each experiment but also provides step-by-step instructions to help you build your own projects at home.
1. Using Magnets to Create a Floating Globe
Concept and Science
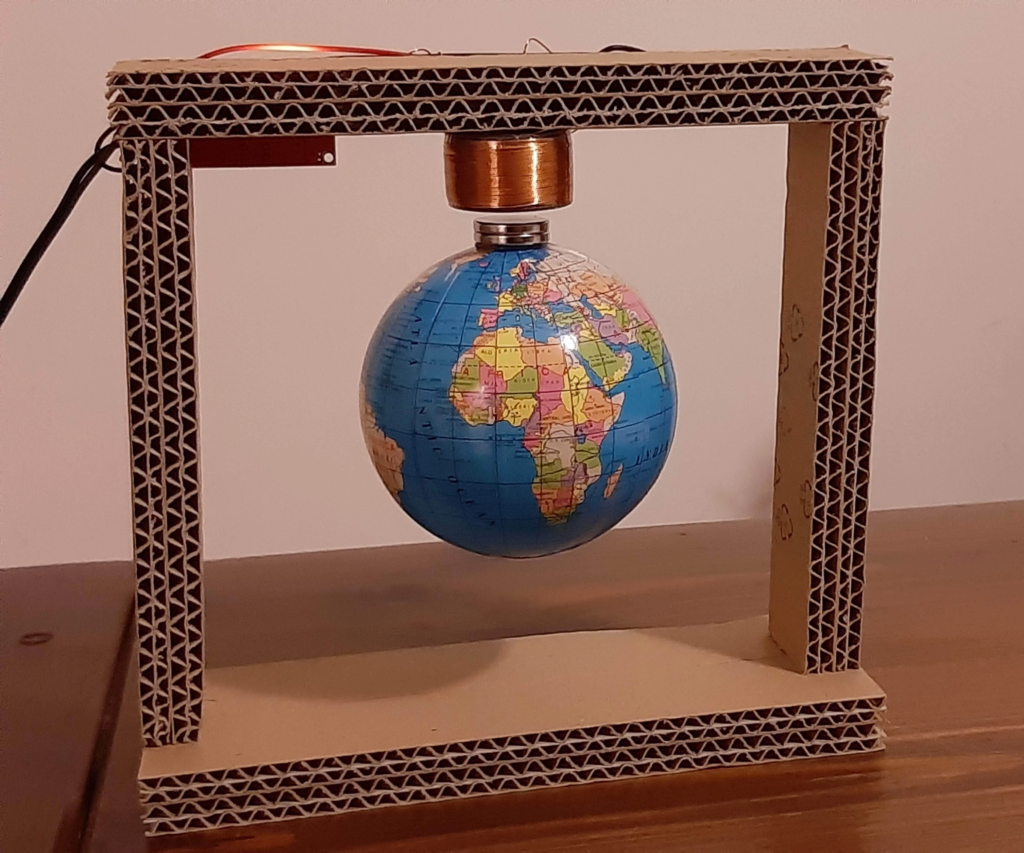
Imagine a miniature Earth suspended in mid-air with no strings or supports—this is the magic of magnetic levitation. The idea behind a floating globe (or levitating Earth) is to balance magnetic repulsion with gravitational pull. By carefully arranging magnets so that their like poles face each other, you create a repulsive force that can counteract gravity. With precise positioning and a stable base, a small globe can appear to defy gravity, floating effortlessly above its platform.
Materials and Tools
- A spherical object: This can be a lightweight ball or a plastic globe.
- Strong neodymium magnets: These provide the necessary magnetic field.
- A base platform: A sturdy board or a specially designed platform that contains magnets arranged in a precise pattern.
- Adhesives and non-magnetic supports: For securing the magnets in place.
Building Process
- Design the Base: Create a platform where you can embed or attach magnets in a circular or grid pattern. The arrangement should be such that the magnetic fields interact to form a “magnetic well” that can hold the globe in place.
- Prepare the Globe: Inside the globe, embed a magnet with its orientation opposite to the magnets on the base. Make sure the magnet is securely fixed so it doesn’t shift during levitation.
- Test and Adjust: Place the globe above the base and observe the levitation. Adjust the magnet positions until the repulsive force exactly balances the weight of the globe. Small modifications—such as adding spacers or repositioning magnets—might be necessary.
- Stabilization: Once levitation is achieved, add non-magnetic supports or dampers that keep the globe centered, minimizing unwanted tilting or rotation.
Experimentation and Observations
In this experiment, you’ll notice that the globe “floats” due to the repelling forces of the magnets. It’s a striking visual demonstration of magnetic fields and equilibrium. Experiment with different magnet arrangements to see how the levitation height and stability change. This project also opens discussions about magnetic field lines, potential energy in a magnetic field, and the challenges of achieving stable levitation.
2. DIY Maglev Train Model

Concept and Science
Maglev trains—short for magnetic levitation trains—are a fascinating real-world application of magnetism, using repelling forces to lift and propel the train along a guideway. A DIY maglev train model replicates this principle on a small scale, providing a hands-on understanding of how magnetic fields can reduce friction and allow smooth, high-speed movement.
Materials and Tools
- Track or guideway: A non-magnetic surface, such as acrylic or wood.
- Neodymium magnets: Both for the train and the track.
- Lightweight train model: A small platform or vehicle that can house magnets.
- Power source (optional): For additional propulsion, such as small batteries or a low-voltage motor.
Building Process
- Construct the Track: Lay out a track where magnets are embedded in a linear pattern. Ensure the magnets on the track have a consistent polarity that will repel the magnets attached to the train.
- Prepare the Train: Attach magnets to the underside of the train model. The magnets must be oriented to face the same direction as those on the track (i.e., like poles facing each other), creating a cushion of repulsive force.
- Alignment and Testing: Place the train on the track and observe how it hovers above the surface. Adjust the positioning of the magnets if the train tilts or skews off track.
- Adding Propulsion: To simulate movement, you can use a small motor or an electromagnet system that periodically changes the magnetic field along the track, pushing the train forward. Alternatively, you can design a manual trigger system that interacts with the train’s magnetic field.
Experimentation and Observations
Experiment with the spacing between magnets, both on the train and the track. Notice how the strength of repulsion affects the levitation height and stability of the train. This project offers insights into frictionless motion and the potential for energy-efficient transportation systems. It also serves as a practical demonstration of how precise engineering and magnetic alignment are critical to the functioning of high-speed maglev systems.
3. Experiment with Magnets and Liquid Metal

Concept and Science
Magnetic fields can interact with materials in unexpected ways. Liquid metals, such as gallium alloys, are particularly interesting because they combine fluid dynamics with electromagnetic properties. Although mercury is a well-known liquid metal, its toxicity makes gallium-based alloys a safer alternative for home experiments. When exposed to a magnetic field, the liquid metal can form striking shapes and patterns, visually demonstrating the influence of magnetic forces on conductive fluids.
Materials and Tools
- Liquid metal (gallium alloy): Safe and non-toxic, often available from specialty suppliers.
- Neodymium magnets: Strong enough to manipulate the liquid metal.
- A shallow, non-magnetic container: To hold the liquid metal during the experiment.
- Protective equipment: Gloves and eye protection, to handle the metal safely.
Experimentation Steps
- Setup the Container: Pour a small amount of the gallium alloy into the container. Ensure that the container is on a stable, flat surface.
- Apply the Magnetic Field: Slowly bring a neodymium magnet close to the container and observe how the liquid metal reacts. The magnetic field should cause the metal to form peaks, troughs, and sometimes even dynamic “spikes.”
- Record Observations: Notice how the shapes change as you move the magnet around the container. This experiment provides a vivid example of the interplay between fluid dynamics and magnetic forces.
Scientific Discussion
Liquid metals are electrically conductive, and when placed in a magnetic field, currents are induced that interact with the magnetic field itself. This phenomenon, known as magnetohydrodynamics, is a complex but visually appealing demonstration of physics. The patterns you see are the result of the metal responding to the force gradients created by the magnet, and similar principles are used in industrial processes such as metal casting and electromagnetic stirring.
4. Building a Simple Electric Motor with Magnets

Concept and Science
One of the classic demonstrations of magnetism in motion is the electric motor. At its core, an electric motor converts electrical energy into mechanical energy through the interactions between magnetic fields and electric currents. Building a simple motor from scratch is not only educational but also a fun introduction to the basics of electromagnetism.
Materials and Tools
- Copper wire: Enamel-coated magnet wire is ideal for creating the motor coil.
- Magnets: Neodymium magnets provide a strong, consistent magnetic field.
- Battery: A small battery, such as a AA or 9V, to power the motor.
- Paper clips or a simple support structure: To create the motor’s axle and support the coil.
- Basic tools: Wire cutters, sandpaper, and tape.
Building Process
- Create the Coil: Wind the copper wire into a coil with several loops. Leave two straight ends that will act as the connection points for the battery.
- Prepare the Axle: Use a paper clip or a small rod to serve as the axle for the coil. Secure it in such a way that the coil can spin freely.
- Attach the Magnets: Place the magnets near the coil, ensuring that they are close enough to interact with the magnetic field created by the current in the coil.
- Connect the Circuit: Strip the enamel off the ends of the copper wire using sandpaper and attach them to the battery terminals. The flow of current through the coil will generate its own magnetic field, which interacts with the static magnets, causing the coil to spin.
- Fine-Tuning: Experiment with the position of the magnets and the shape of the coil to maximize the rotational speed and stability of the motor.
Observations and Discussion
This experiment provides a tangible demonstration of electromagnetic induction. As the electric current flows through the coil, it creates a magnetic field that either repels or attracts the nearby static magnets, resulting in rotation. By modifying the coil’s dimensions or the strength of the magnets, you can explore the relationship between electrical input and mechanical output. This simple motor is the foundation of many modern appliances and devices, illustrating how fundamental principles can lead to revolutionary technology.
5. Understanding How Magnets Attract and Repel

Concept and Science
At the heart of every magnetic experiment lies the simple yet profound principle of magnetic poles. Every magnet has two poles—north and south. When two magnets are brought together, opposite poles attract while like poles repel. This basic property can be demonstrated in a variety of ways, both in controlled experiments and everyday interactions.
DIY Demonstrations
- Pole Identification: Use a compass to identify the north and south poles of different magnets. By moving the magnet near the compass, you can observe how the needle aligns with the magnetic field.
- Repulsion and Attraction: Place two magnets together in different orientations. Experiment with aligning north-to-south (attraction) and north-to-north (repulsion) to see firsthand how magnetic forces work.
- Force Measurement: If you have a small scale or force sensor, you can even measure the strength of the repulsive or attractive forces between the magnets. This simple measurement can lead to discussions about magnetic field strength and the inverse-square law.
Discussion
Understanding how magnets attract and repel is crucial to mastering more advanced experiments. This section serves as both a theoretical foundation and a practical demonstration. By experimenting with different configurations, you gain insights into the subtleties of magnetic fields, including how distance and orientation affect the force between magnets.
6. Can Magnets Bend Water Flow?
Concept and Science
Water is typically not magnetic; in fact, it is weakly diamagnetic. This means that water is repelled by magnetic fields, but the effect is usually so slight that it’s difficult to observe in everyday conditions. However, under certain conditions and with particularly strong magnets, you can observe minor distortions in water flow.
Experimentation Steps
- Setup: Fill a clear container with water and add a few food coloring drops to better visualize the flow.
- Introduce the Magnet: Slowly bring a strong neodymium magnet close to the container. Observe if the water stream or the swirling patterns of the food coloring change as the magnetic field interacts with the water.
- Observation: In most cases, the effect will be subtle. However, with careful observation, you may notice a slight curvature or deflection in the water flow where the magnetic field is strongest.
Scientific Discussion
While water is not ferromagnetic, its weak diamagnetic properties mean that it is slightly repelled by magnetic fields. This experiment provides an opportunity to discuss magnetic susceptibility—the degree to which a material can be magnetized—and how even non-magnetic substances can exhibit interesting behaviors when subjected to strong magnetic fields.
7. Fun Experiment with Magnets and Iron Filings
Concept and Science
One of the most visually appealing demonstrations of magnetism is the experiment using magnets and iron filings. Iron filings, being tiny particles of ferromagnetic material, align themselves along magnetic field lines, revealing the invisible patterns of the magnetic field around a magnet.
Materials and Tools
- Iron filings: Easily available from craft or science supply stores.
- A flat, non-magnetic surface: Such as a piece of glass or plastic.
- A strong magnet: Neodymium magnets work best for a clear demonstration.
- Paper and a small brush: For cleaning up afterward.
Procedure
- Preparation: Spread a thin layer of iron filings over the surface.
- Magnet Placement: Gently place a magnet underneath the surface or directly on top. Watch as the iron filings begin to align and form intricate patterns that mirror the magnetic field lines.
- Experimentation: Move the magnet slowly and observe how the filings rearrange themselves in real time. Experiment with different magnet shapes (bar magnets, ring magnets) to see how the patterns vary.
Discussion
This experiment not only provides a striking visual representation of an otherwise invisible force but also introduces the concept of field lines. The resulting patterns help in understanding the distribution and strength of the magnetic field, reinforcing theoretical concepts with tangible, observable evidence.
8. How Magnets Affect a Compass
Concept and Science
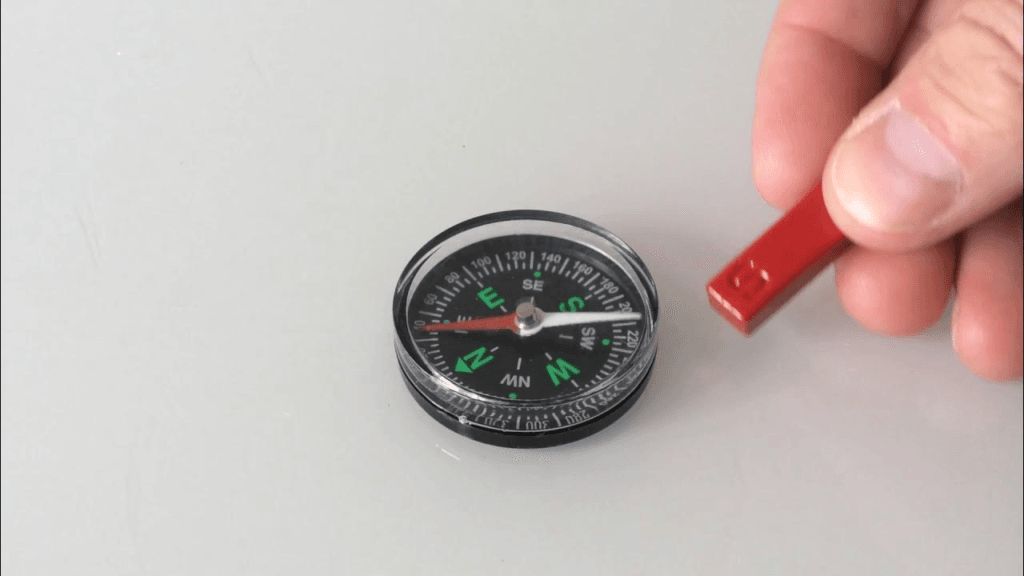
A compass is one of the simplest devices that harnesses the power of magnetism. It works by aligning its magnetic needle with the Earth’s magnetic field. However, the presence of other strong magnets can disrupt this alignment, providing a straightforward demonstration of magnetic interference.
Demonstration
- Using a Compass: Start with a standard compass and observe its steady alignment with the Earth’s magnetic north.
- Introducing a Magnet: Slowly bring a neodymium magnet near the compass. Notice how the needle shifts its orientation to point toward the stronger, local magnetic field created by the magnet.
- Interference Patterns: Experiment by moving the magnet around the compass and noting the needle’s response. This can also lead to discussions about the relative strength of magnetic fields and how localized fields can overwhelm the Earth’s weak magnetic field in a small area.
Discussion
This simple experiment illustrates the fundamental principle that magnetic fields are vector quantities that add together. The compass needle’s deflection is a direct result of the superposition of the Earth’s magnetic field and the field from the nearby magnet. It’s a perfect demonstration for both young students and curious hobbyists to understand how compasses work and why they are sometimes unreliable near strong magnets.
9. Can Magnets Penetrate Different Materials?
Concept and Science
One of the intriguing questions in magnetism is how magnetic fields interact with various materials. Some materials, like iron, are ferromagnetic and can be easily influenced by magnets. Others, such as wood or plastic, are non-magnetic and do not affect magnetic fields. This experiment explores the permeability of different substances to magnetic fields.
Experimentation Steps
- Gather Materials: Collect a variety of objects made from different materials—metal (iron, steel), plastic, wood, and even glass.
- Test Magnetic Influence: Use a strong magnet and test its effect on each material. Observe if the magnet is able to attract or affect the material even when it’s enclosed in a non-magnetic substance.
- Measurement and Analysis: Note any differences in how the magnetic field penetrates or is blocked by these materials. For instance, metals with high magnetic permeability will channel the magnetic field, while non-magnetic materials will allow the field to pass through relatively unchanged.
Discussion
This experiment demonstrates that magnetic fields are not uniformly affected by all materials. Ferromagnetic materials can concentrate magnetic fields, while others are largely transparent to them. This principle is critical in various applications, such as magnetic shielding and designing devices that must operate reliably in the presence of external magnetic fields.
10. Magnets in Magic: Applications in Illusions
Concept and Science
Magicians have long used magnets to create illusions that captivate audiences. From “floating” objects to disappearing acts, magnetic forces offer a reliable method for manipulating everyday items in unexpected ways. Understanding how magicians harness magnetism can lead to both entertaining experiments and deeper insights into the principles of magnetism.
Examples and Techniques
- Floating Objects: Similar to the levitating globe experiment, magicians often use concealed magnets to make small objects appear as if they’re suspended in mid-air. By strategically placing magnets out of the audience’s view, the illusion of levitation is convincingly achieved.
- Hidden Connections: Some magic tricks rely on magnets to secretly link or disconnect objects. For instance, a magician might use a magnet hidden under a table to control a metal object on the surface, creating the illusion of telekinesis.
- Switching Effects: Magnets can also be used to create rapid switching effects. For example, a seemingly ordinary card or coin trick might be enhanced by a concealed magnetic device that swiftly changes the object’s position.
Discussion
The use of magnets in magic is a beautiful blend of science and showmanship. By understanding the underlying physics, magicians can design tricks that are not only visually stunning but also reproducible by anyone with a bit of creativity and technical know-how. This crossover between science and art highlights the versatility of magnetism and its potential to inspire wonder.
Conclusion: The Joy of DIY Magnetic Experiments
Exploring magnetism through DIY projects and experiments is an engaging way to learn about science and engineering. Whether you’re levitating a miniature Earth, building a model maglev train, or watching iron filings trace the invisible lines of a magnetic field, each experiment offers a hands-on lesson in physics. These projects demonstrate the balance between theory and practical application, showing how simple principles can lead to extraordinary outcomes.
The beauty of working with magnets lies in their accessibility and the wealth of creative opportunities they offer. From the fundamental interactions of attraction and repulsion to the advanced applications seen in modern technology and magic, magnets provide an endless source of inspiration. DIY experiments not only enhance your understanding of magnetic phenomena but also empower you to explore, innovate, and even entertain others with your newfound skills.
By following the detailed instructions provided in this article, you can create a variety of projects that are as educational as they are fun. Each experiment encourages critical thinking, problem-solving, and an appreciation for the subtle interplay of forces that shape our world. So, gather your magnets, assemble your materials, and let curiosity be your guide on this magnetic adventure.
In summary, the projects we discussed—from floating globes and maglev trains to electric motors and magical illusions—serve as a testament to the power and versatility of magnetism. They remind us that sometimes, the most captivating scientific phenomena can be experienced first-hand right in our own homes. Embrace the challenge, enjoy the process, and who knows? Your next DIY project might just spark the innovative idea that changes the way you see the world.