
1. Refrigerator Magnets: From Memorabilia to Micro‑Organization
1.1 History and Materials
- Origins: The first refrigerator magnets appeared in the 1950s, shortly after household refrigerators transitioned from wooden exteriors to enameled steel doors. Early magnets were rigid, brittle ceramic (“ferrite”) pieces glued to a thin metal backing and decorated with simple designs.
- Modern Composition: Today’s fridge magnets often use a flexible magnetic sheet—ferrite powder embedded in a polymer matrix—bonded to decorative faces made of paper, plastic, resin, or metal. High‑end versions may even incorporate neodymium inserts for extra holding power.
1.2 Functional Uses

- Family Command Center
- Photo Gallery: Display snapshots of vacations, milestones, or children’s artwork. Arrange magnets in grids or thematic clusters (e.g., “Summer 2024”) to create a mini‑exhibition.
- Message Board: Clip grocery lists, appointment cards, to‑do reminders, or take‑out menus. Use magnetic clips (like mini clothespins) for thicker stacks.
- Calendar Anchors: Many modular wall calendars are fully magnetic; you can reposition entire weeks or months as needed.
- Kitchen Workflow
- Recipe Holders: Instead of smudging cookbooks with sauce splatters, stick recipe printouts directly to the door at eye level.
- Ingredient Inventory: Attach a small whiteboard magnet to jot down low‑stock items; wipe and reuse.
- Aesthetic and Seasonal Decor
- Seasonal Switch‑Outs: Swap holiday‑themed magnets (e.g., pumpkins, snowflakes) to keep the kitchen lively year‑round.
- DIY Projects: Make your own magnets by gluing bottle caps, small photos, or pressed flowers onto magnet backs.
1.3 Strength, Size, and Placement Tips
- Magnetic Pull: A standard fridge magnet holds about 50–200 g. For heavier items (e.g., small notepads, clipboards), choose magnets rated for 500 g or more—often containing embedded rare‑earth elements.
- Surface Care: Place thin felt or rubber bumpers on magnet edges to prevent scratches.
- Even Distribution: For large printouts or multiple sheets, use at least two magnets at the top corners to avoid slippage.
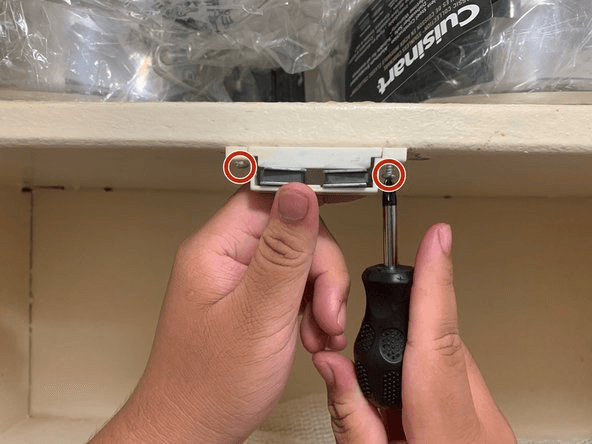
2. Magnetic Cabinet Latches: Silent Security and Childproofing
2.1 Why Magnetic Latches?
- Silent Operation: Unlike mechanical catches, magnetic latches close without the audible “click” or “clack,” making them ideal for nurseries, bedrooms, or late‑night snack raids.
- Hidden Hardware: Mounted inside cabinets, magnets remain invisible from the outside, preserving clean cabinet lines.
2.2 Components and Installation
- Strike Plate (Metal Catch): Affixed to the cabinet door’s interior face.
- Magnetic Catch: Installed inside the cabinet frame. It contains a small pot magnet (or two opposing magnets) encased in plastic.
- Tools Needed: Screwdriver (or drill with small‑bit), measuring tape, pencil, and—if using adhesive mounts—strong double‑sided tape.
Step‑by‑Step Guide
- Mark Positions: Close the door and mark where the strike plate meets the frame.
- Pre‑Drill Holes: If screwing, drill pilot holes to prevent wood splitting.
- Attach Catch: Secure the magnetic catch inside the cabinet, ensuring its face aligns flush with the frame.
- Attach Strike Plate: Align and mount the metal plate on the door.
- Test and Adjust: Open and close several times. If the door feels loose, increase magnet strength or shift plates slightly for better alignment.
2.3 Use Cases
- Child Safety: Keep toddlers out of dangerous cabinets containing cleaners, knives, or medications. For extra security, combine with latch locks that require a push‑and‑slide motion.
- Pet‑Proofing: Prevent curious dogs or cats from tipping trash cans or eating pet food.
- Luxury Furniture: High‑end cabinetry often uses magnetic catches to create a seamless look without visible knobs or handles.
2.4 Pros and Cons
| Advantage | Consideration |
|---|---|
| Silent, invisible closure | Requires precise alignment |
| Easy retrofit for existing cabinets | Limited holding force for very heavy doors |
| No visible hardware | Adhesive‑only mounts may weaken over time |
3. Magnetic Knife Holders: A Chef’s Best Friend
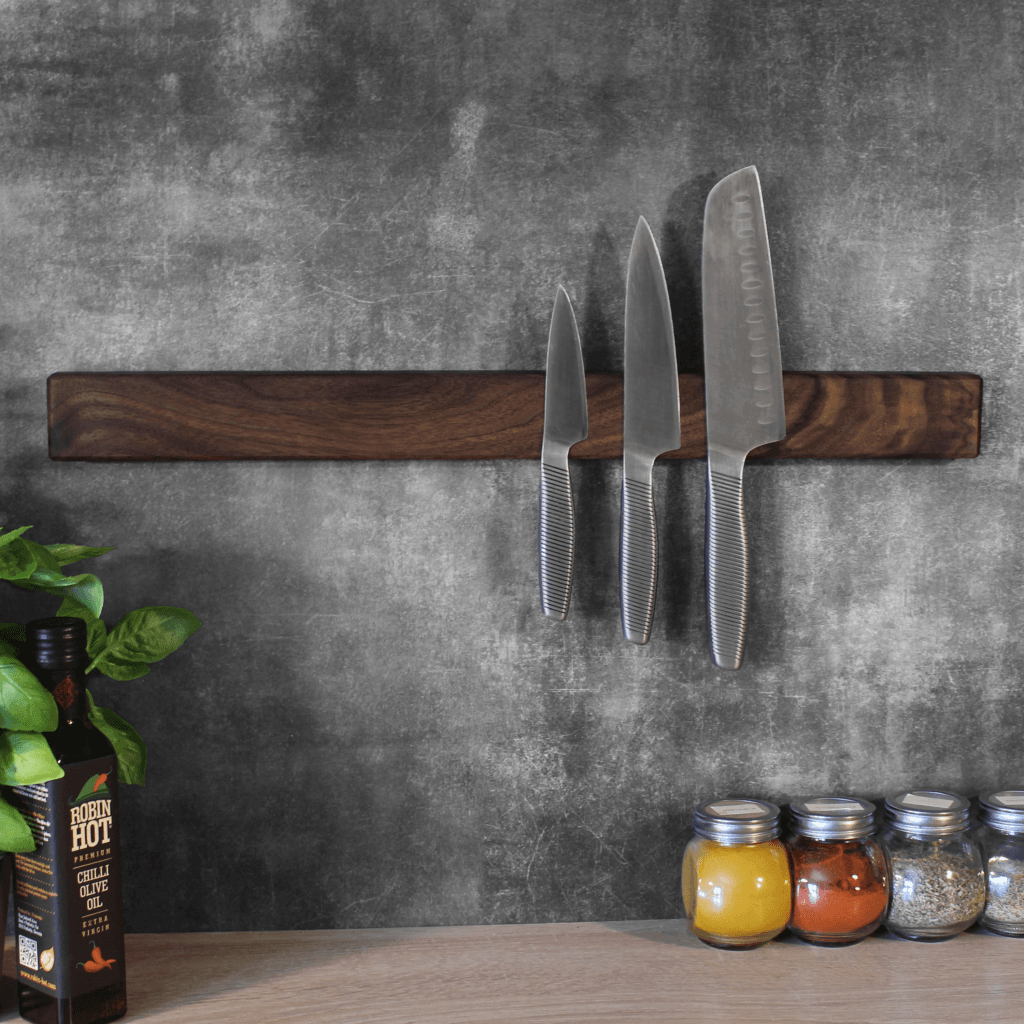
3.1 Magnet Types and Pull Strength
- Neodymium Bars: The strongest commercially available magnets, rated N35–N52. A 30 cm N52 bar can hold dozens of knives totaling several kilograms.
- Ceramic (Ferrite) Bars: Weaker but more heat‑resistant and corrosion‑proof—useful in humid environments.
3.2 Mounting Options
- Wall‑Mounted Bars: Screw‑in installation using wall anchors; ideal for permanent setups.
- Freestanding Blocks: Wooden or acrylic blocks with magnets embedded horizontally; portable but occupy counter space.
- Corner Strips: L‑shaped holders fitting neatly into 90° corners.
3.3 Safety and Ergonomics
- Blade Exposure: Always place knives with blades downward or sideways, not pointing upward. This minimizes accidental cuts.
- Height Considerations: Mount at chest height for adults—low enough to reach but high enough to stay out of children’s grasp.
- Spacing: Leave 3–5 cm between knives to avoid clashing blades and to ensure easy retrieval.
3.4 Creative Variations
- Colored Magnets: Use different‑colored magnet housings to code knives by function (e.g., red for meat, green for vegetables).
- Integrated Shelf: Combine a magnetic strip with a narrow shelf below to hold small utensils or seasoning shakers.
- Magnetic Inlay in Countertop: For custom kitchens, embed a magnet strip flush with the backsplash for a seamless look.
4. Magnetic Tool Holders: Workshop and Garage Efficiency
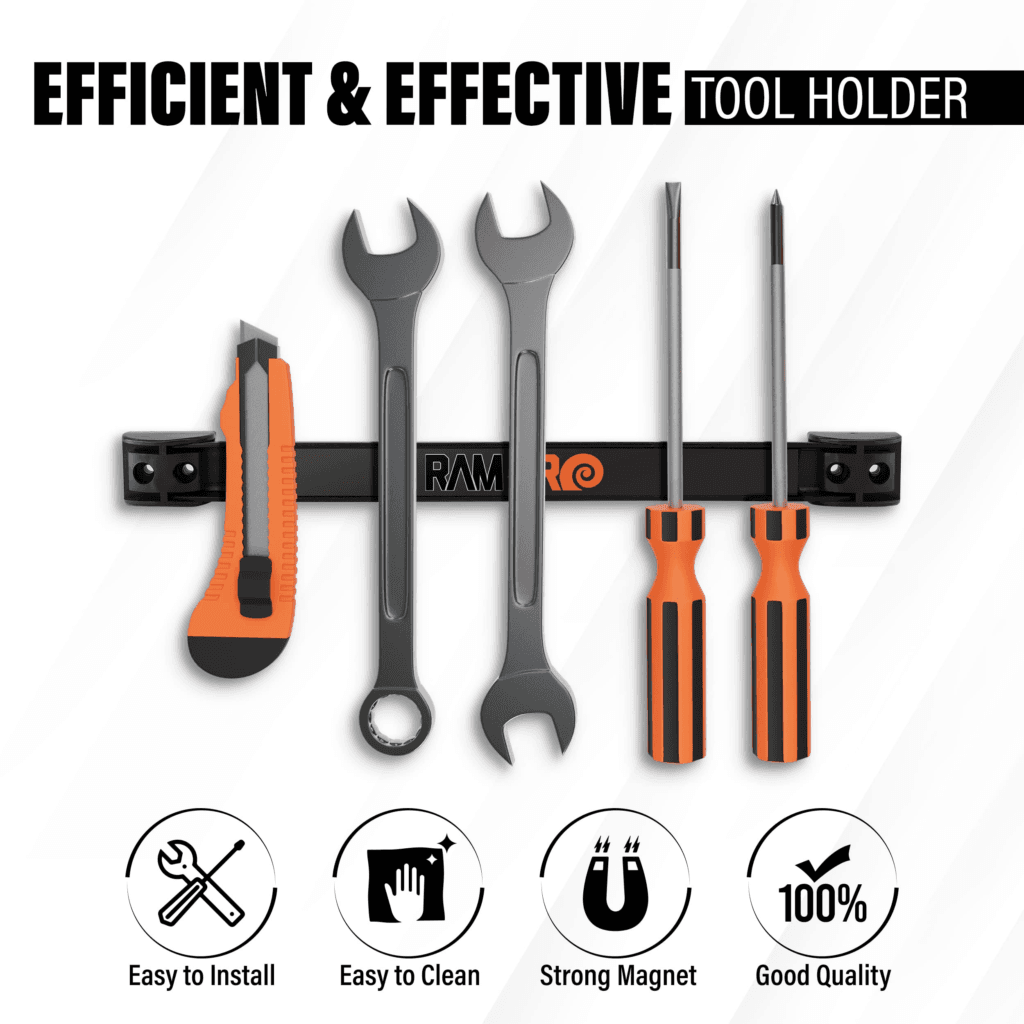
4.1 From Hobbyist to Professional
- Home DIYers: Keep screwdrivers, pliers, and scissors within arm’s reach.
- Mechanics and Woodworkers: Organize wrenches, drill bits, and chisels without drilling multiple pegboard holes.
4.2 Installation and Weight Capacity
- Wall Studs vs. Drywall: Always anchor heavy tool holders into studs. A single stud‑mounted neodymium bar can support 5–10 kg.
- Multiple Bars: For heavy tool collections, install several shorter bars rather than one long strip to distribute weight evenly.
4.3 Specialized Holders
- Magnetic Bit Holders: Small magnetic blocks with labeled slots for drill and driver bits.
- Magnetic Socket Racks: Metal racks with embedded magnets that hold socket sets upright for quick size identification.
- Magnetic Parts Trays: Portable trays with magnetic bases to hold nuts, bolts, and screws when working on vehicles or appliances.
4.4 Best Practices
- Tool Shape Considerations: Tools with large flat surfaces (e.g., spanners) stick better than rounded handles—orient them to maximize contact.
- Corrosion Prevention: If tools are prone to rust, ensure bars are coated or use stainless steel‑backed magnets.
- Accessibility: Place most‑used tools at eye level; lesser‑used items higher or lower.
5. Magnetic Phone Mounts: Seamless Integration
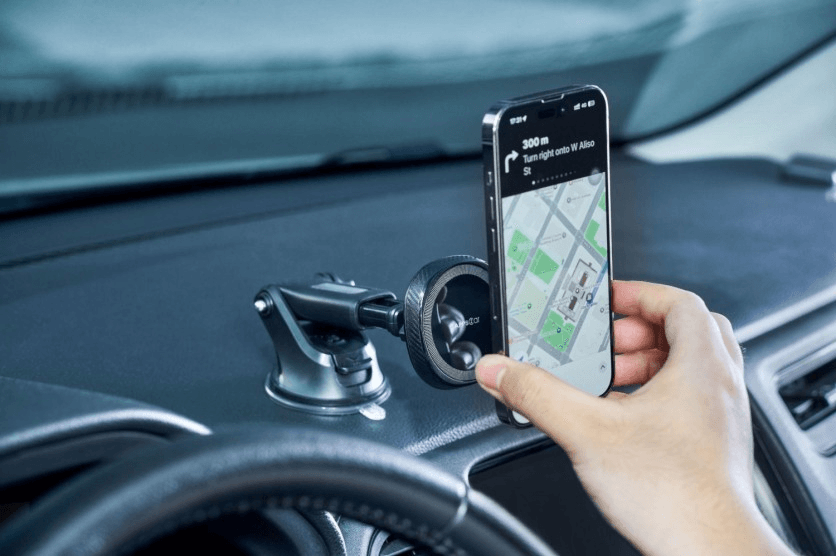
5.1 Magnet and Plate Design
- Magnet Housing: Usually ABS plastic with a built‑in N42–N52 neodymium disc.
- Metal Plates: Ultra‑thin (0.3–0.5 mm) to preserve wireless‑charging compatibility. Plates come with adhesive backing or fit inside phone cases.
5.2 Automotive Applications
- Dashboard Discs: Low‑profile magnets that adhere to dashboards; pair with air‑vent clips for flexible placement.
- 360° Rotation: Ball‑joint designs allow portrait or landscape orientation.
5.3 In‑Home and Office Uses
- Kitchen Mounts: Stick a mount on the refrigerator or under cabinets to watch cooking tutorials hands‑free.
- Desk Stands: Attach mounts to metal monitor stands or desk partitions for easy reference during video calls.
- Workshop Phones: Mount on toolboxes or machinery to keep reference schematics visible.
5.4 Installation and Safety
- Clean Surface: Wipe mounting surface with alcohol to ensure strong adhesion.
- Avoid Airbag Zones: In cars, never mount on or near airbags.
- Weight Limits: Most mounts support phones up to 250 g; heavier tablets require specialized holders.
6. Magnetic Door Stops and Holders: Elegance Meets Function
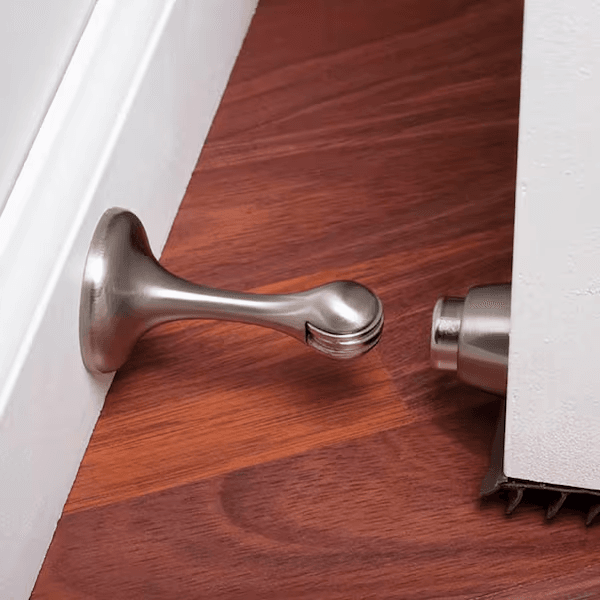
6.1 How They Differ from Traditional Stops
- Traditional Wedges: Prone to slipping, require manual placement.
- Magnetic Stops: Engage automatically when the door opens; release with a gentle pull.
6.2 Types and Installation
- Floor‑Mounted Magnets: Embed a magnet flush with the floor (or screw‑on plate) and mount the counterpart on the door’s lower edge.
- Wall‑Mounted Catches: Install a magnetic cup on the wall and a strike plate on the door—ideal for lighter interior doors.
6.3 Use Cases and Benefits
- High‑Traffic Areas: Keep entryway doors open during moving in/out or when carrying groceries.
- Ventilation: Hold screen doors open for airflow without risk of wind slamming them shut.
- Child and Pet Control: Prevent little ones or pets from darting through doors inadvertently.
6.4 Design Considerations
- Magnet Strength: Heavy exterior doors may need 2–3 kg pull‑force magnets; interior doors often only require 500–1,000 g.
- Finish Coordination: Choose brass, chrome, or matte‑black housings to match door hardware.
- Threshold Clearance: Ensure floor magnets don’t create tripping hazards; recess into floor or use low‑profile designs.
7. Magnetic Light Fixtures and Lamps: Instant, Tool‑Free Lighting
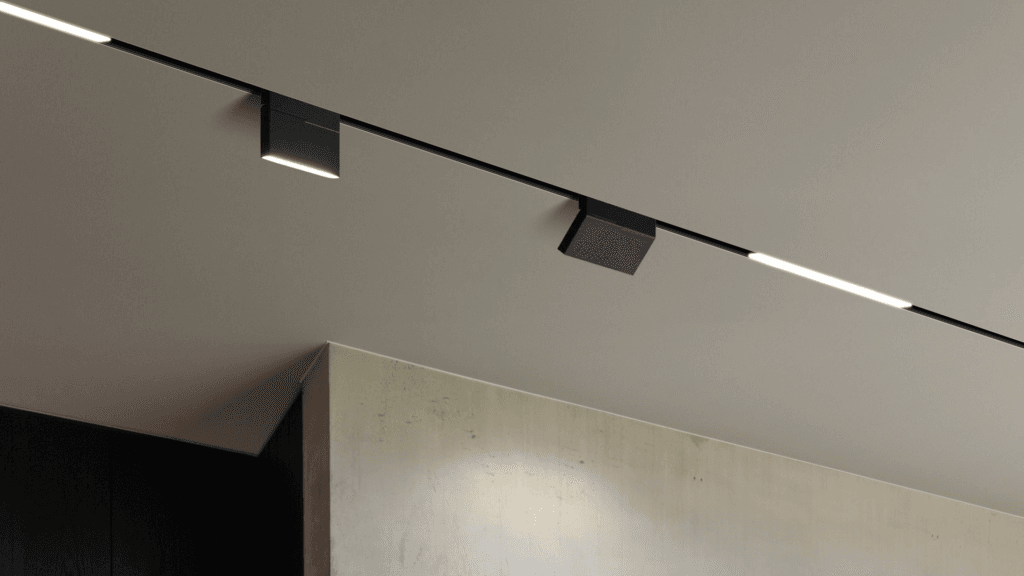
7.1 Types of Magnetic Lights
- Puck Lights: Round LED fixtures with magnetic bases; often battery‑powered and dimmable.
- Strip Lights: Flexible LED strips with magnetic backing—snap onto metal shelving or appliance sides.
- Task Lamps: Small gooseneck lamps with magnetic bases for workbenches or under‑cabinet tasks.
7.2 Installation Scenarios
- Under‑Cabinet Illumination: Affix a strip light beneath upper cabinets to brighten countertops.
- Closet and Pantry: Mount puck lights on metal shelving for clear visibility in tight spaces.
- Vehicle Maintenance: Use magnetic work lights on car hoods or chassis for hands‑free illumination.
7.3 Advantages Over Hardwired Lighting
- No Wiring: Great for renters or for quick, temporary installations.
- Repositionable: Move lights as tasks or layouts change—no new holes required.
- Rechargeable Batteries: Many models use USB‑C charging; a single charge can last weeks.
7.4 Brightness, Color, and Controls
- Lumens: Choose 100–300 lm puck lights for accent lighting; 500–1,000 lm for task areas.
- Color Temperature: Warm white (2,700–3,000 K) for cozy kitchens; cool white (4,000–5,000 K) for workshops.
- Control Options: Look for touch‑sensitive, remote‑controlled, or motion‑activated models for added convenience.
8. Magnetic Spice Jars: A Chef’s Organization Hack
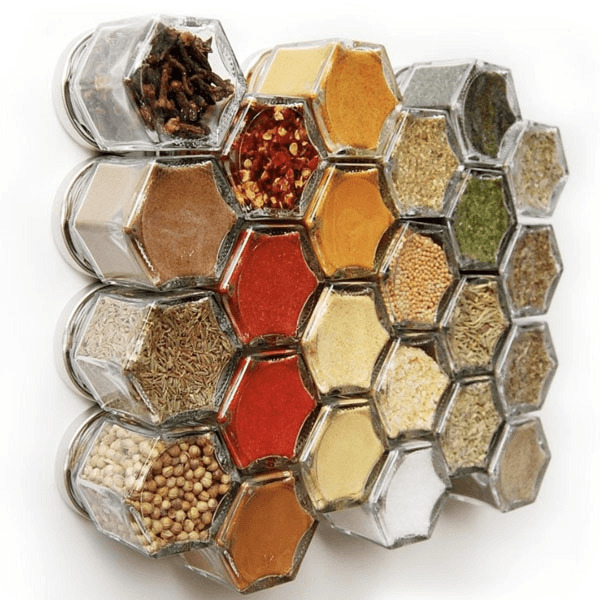
8.1 Jar and Lid Design
- Glass vs. Plastic: Glass jars resist staining and odors; plastic is lighter and less prone to breakage.
- Lid Magnets: Embedded disc magnets (5–10 mm thick) in metal lids snap onto strips or boards.
8.2 Mounting Boards and Strips
- Wall‑Mounted Rails: Aluminum or stainless‑steel strips fixed to backsplashes or inside cabinet doors.
- Magnetic Chalkboards: Dual‑purpose boards for spice jars and handwritten shopping lists.
- Free‑Standing Racks: Magnetic base on countertop racks—no wall drilling needed.
8.3 Organization Strategies
- Alphabetical or By Cuisine: Group spices A–Z or cluster by use (e.g., “Indian,” “Italian,” “Baking”).
- Color‑Coding: Use colored lids or labels—red for chilies, green for herbs, yellow for curries.
- Labeling: Apply clear, water‑resistant labels on jar sides or lids; include spice name and purchase date.
8.4 Maintenance and Refill Tips
- Refill Alerts: Keep one empty jar on the strip as a “reminder” when you finish a spice.
- Shelf Life: Whole spices last ~2–4 years; ground spices ~1–2 years. Rotate older spices to the front.
- Cleaning: Remove jars and wipe boards monthly to prevent dust buildup.
9. Magnetic Closures: Sleek Fastening in Textiles and Accessories
9.1 How Fabric Magnets Are Made
- Encapsulated Discs: Small neodymium discs sealed in plastic or fabric pouches to prevent rust and snagging.
- Ferrous Plates: Thin steel plates sewn into the opposite fabric side when only one magnet is used.
9.2 Common Applications
- Handbags and Wallets: Provide quick‑snap closures without bulky snaps or zippers.
- Curtain Tiebacks: Magnetic tiebacks wrap around curtains and snap together, eliminating wall hooks.
- Throw Pillow Covers: Hidden closures at the back seam for seamless aesthetics.
- Adaptive Clothing: Aid dressing for people with limited dexterity—magnetic closures replace buttons or zippers.
9.3 Design and Durability
- Pull Strength: Typically 200–500 g per magnet—strong enough for light fabrics but gentle to open.
- Washability: Encapsulated magnets can be machine‑washed if properly sealed; always follow garment care labels.
- Wear and Tear: Over time, magnets can demagnetize slightly; choose high‑quality neodymium variants for longevity.
9.4 DIY Tips
- Sew‑In Pouches: Stitch small fabric pockets to hold magnets; use interfacing to reinforce stress points.
- Metal‑Detectable Tape: Wrap magnets in metal‑detectable tape when using in food‑service textiles (e.g., chef aprons).
- Magnetic Snap Kits: Available in craft stores—include magnet halves and mounting hardware for easy installation.
The Science of Household Magnets
Magnetic Domains and Field Lines
- Domains: In unmagnetized materials, microscopic domains point randomly. In a magnet, domains align uniformly, producing a net magnetic field.
- Field Lines: Invisible loops exiting the magnet’s north pole and re‑entering at the south pole. The density of lines indicates field strength.
Types of Permanent Magnets
| Magnet Type | Composition | Strength | Temperature Stability | Cost |
|---|---|---|---|---|
| Ferrite (Ceramic) | Iron oxide + strontium/carbonate | Low–Moderate | High | Low |
| Alnico | Aluminum, nickel, cobalt | Moderate | Very High | Moderate |
| Neodymium (NdFeB) | Neodymium, iron, boron | Very High | Moderate (≤80 °C) | Higher |
| Samarium‑Cobalt (SmCo) | Samarium, cobalt | High | Very High (≤300 °C) | Highest |
Magnet Safety and Handling
- Electronic Interference: Keep strong magnets away from hard drives, credit cards, and magnetic stripe IDs.
- Pinch Hazards: Powerful magnets can snap together and pinch skin—handle with care.
- Swallowing Risks: Ingestion of multiple small magnets can cause intestinal blockage or perforation; store out of children’s reach.
- Temperature Effects: Exceeding a magnet’s maximum operating temperature can cause irreversible demagnetization.
Maximizing Magnet Performance in Your Home
- Choose the Right Grade: For holding tools or knives, opt for neodymium (N35–N52). For decorative fridge magnets, ferrite suffices.
- Surface Preparation: Clean and dry mounting surfaces; use primer or alcohol wipes for adhesives.
- Corrosion Protection: In humid areas (e.g., bathrooms), select magnets with nickel‑copper‑nickel plating or epoxy coating.
- Load Testing: Before final installation, test with weights equal to or greater than the intended load.
- Redundancy: For critical holds (e.g., cabinet doors containing hazardous materials), install dual latches or catches.
Conclusion
Magnets are unassuming yet transformative tools for home organization, safety, and convenience. From the humble refrigerator display to advanced neodymium‑based tool holders, their silent, invisible power streamlines daily routines and elevates interior aesthetics. By selecting appropriate magnet types, understanding pull strengths, and following simple installation and safety guidelines, you can unlock a world of magnetic solutions—from spice‑jar walls to seamless textile closures. Embrace the magnet revolution in your own home and discover how a little attraction can go a long way toward a more efficient, beautiful living space.